I may say that my Vertex Nano 3D printer has been a real workhorse during the last 6 months.
The Nano has been used for nearly all my prints that fits inside the printing area of the Nano.
Materials I have successfully sent through the printer:
PLA
PETG
MoldLay
3DE Ceramic
I have replaced the BuildTak surface with ordinary (much cheaper) blue tape.
Plans for the near future is to replace the hot-end with an E3D-hotend because I need to print some small parts using a 0.25mm nozzle.
Have fun.
Wednesday, December 20, 2017
Sunday, June 4, 2017
Great success!
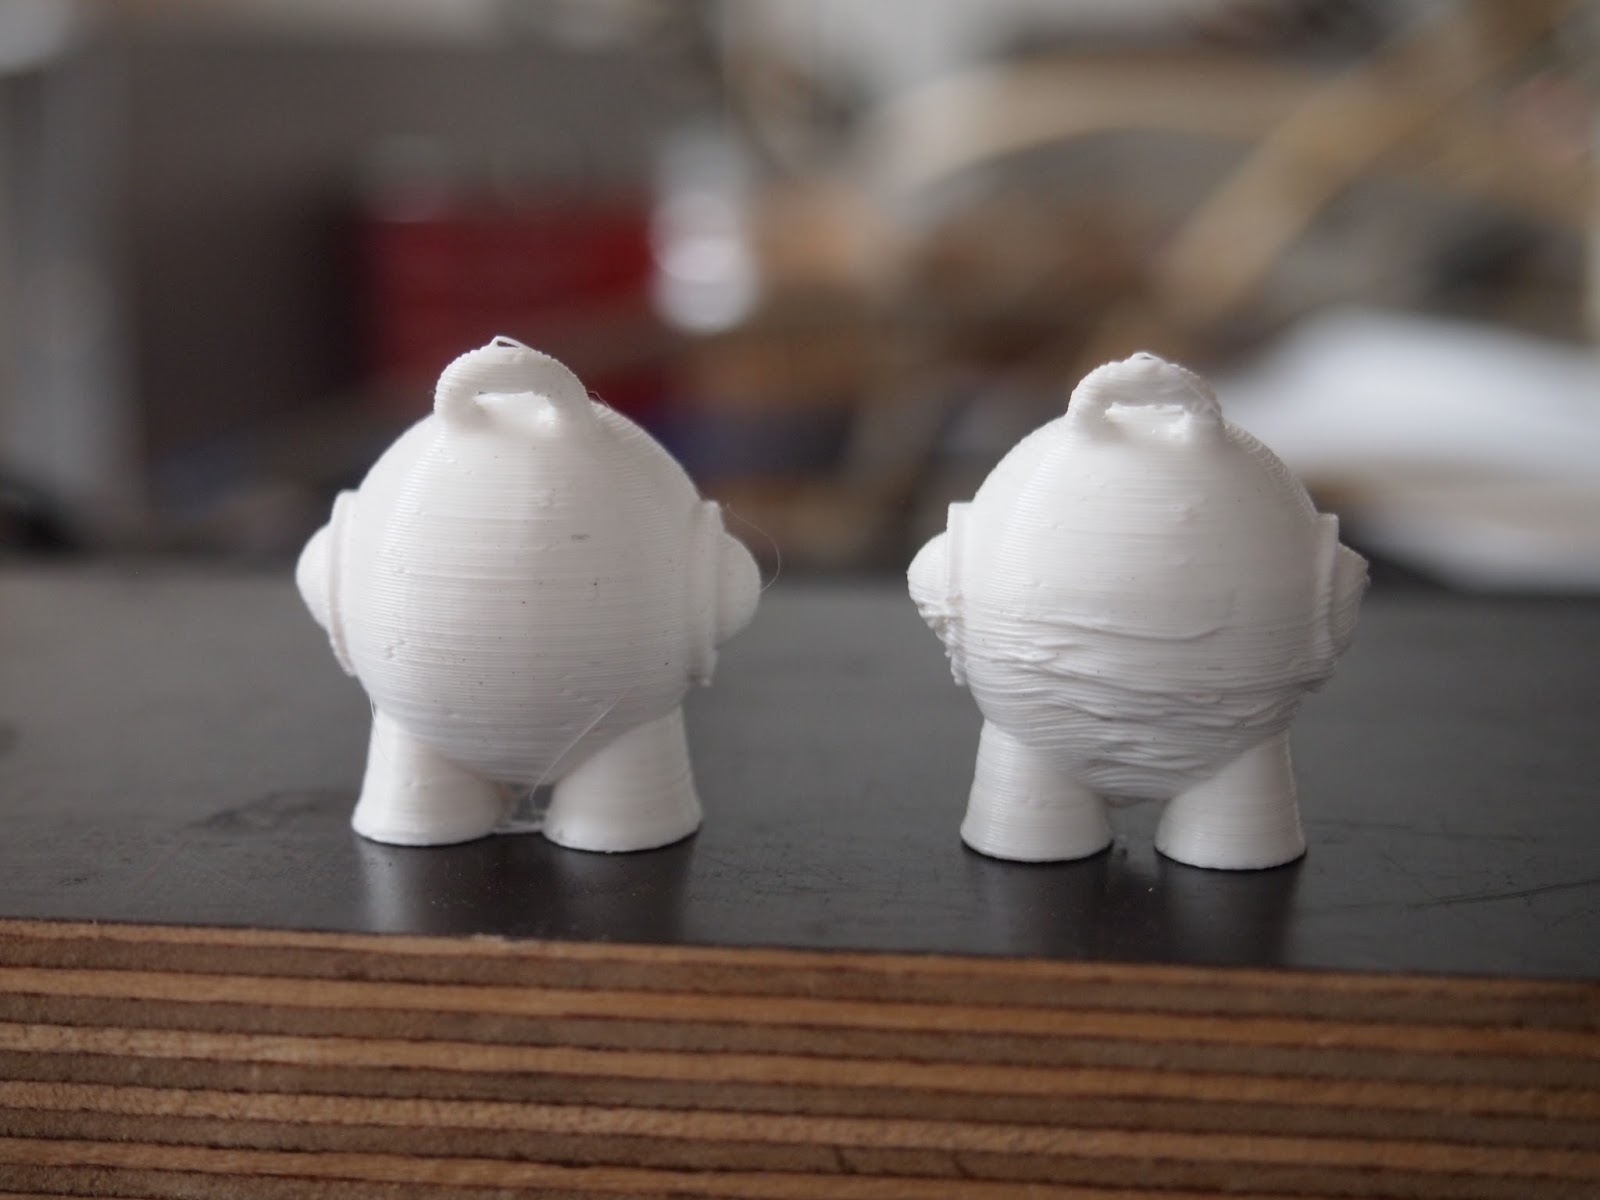
Today I printed a Marvin Keychain.
Left Marvin is from today's print with the new cooling fan and the right Marvin is printed one of the first days with the Vertex Nano printer.
The prints is made with the same gcode file sliced with Simplify3D.
Material PLA, print speed 40mm/sek, layer thickness 0.2mm, temperature 195deg.C, no support.


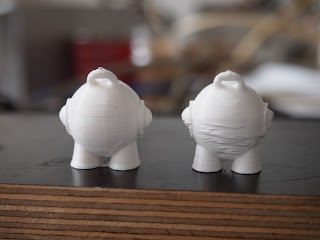

 No touchup has been made on either of the Marvins!
The cooling fan is now published on thingiverse as:
https://www.thingiverse.com/thing:2365148
Happy printing
/Niels
Left Marvin is from today's print with the new cooling fan and the right Marvin is printed one of the first days with the Vertex Nano printer.
The prints is made with the same gcode file sliced with Simplify3D.
Material PLA, print speed 40mm/sek, layer thickness 0.2mm, temperature 195deg.C, no support.


The cooling fan is now published on thingiverse as:
https://www.thingiverse.com/thing:2365148
Happy printing
/Niels
Saturday, June 3, 2017
Modifying firmware for the fan.
I have modified two files in Vertex-Nano-Firmware-master for controlling the cooling fan with standard M106 G-code.
File 1: Marlin-main.cpp
Find the function "set_led_brightness"
// Set led brightness according to current variable
void set_led_brightness()
{
analogWrite(7, map(vertexLedBrightness, 0, 100, 0, 255));
}
and then just put a comment before the AnalogWrite statement:
void set_led_brightness()
{
// analogWrite(7, map(vertexLedBrightness, 0, 100, 0, 255));
}
File 2: pins_K8600.h
Change
#define FAN_PIN 8
to
#define FAN_PIN 7
And then compile and upload to board. I used Arduino IDE ver 1.8.1
The LED can be connected to the 12V pin located near the connector for the internal fan.
Have fun
Niels
Thursday, June 1, 2017
Cooling Fan (Revision 2)
Revision 2 Top view

From bottom

One screw holds it all.

Assembled

And in place

A few modifications to the firmware has to be done before testing but I don't have time during the next few days .-(
Have fun
Niels
Wednesday, May 31, 2017
Simple cooling fan (revision 1)
Photos of my test version of a cooling fan. Here the fans is mounted using double faced tape just to see if the concept is right,
In place:

Bottom view:
 Fan inlet:
 Cooling air out:

Next revision: Mounting holes for fan, Air out a little lower and closer to the filament.
/Niels
In place:

Bottom view:


Next revision: Mounting holes for fan, Air out a little lower and closer to the filament.
/Niels
Saturday, May 27, 2017
Something is rotten with the Vertex Hot-end
Well. The Vertex hot-end sucks.
I have made a few experiments with the Vertex hot-end.
The first experiment was to modify the mounting of the temperature sensing ntc. My thought was that the thermal resistance between the alu-block and the ntc was too high, So I removed the insulating hose around the ntc. Drilled a 2.8mm hole in the aluminium block so the ntc could be mounted inside the block. Just like it is done on other hot-ends.

Then tried to load ABS. 10 minutes observation of temperature. Marlin never found the temperature stable enough to let the filament load begin.
Next experiment was to replace the Vertex ntc with a 100k ntc from an e3d-v6 hot-end.
Result: same as above. No filament loaded.
I don't know much about hot-end design but something is wrong with the Vertex hot-end.
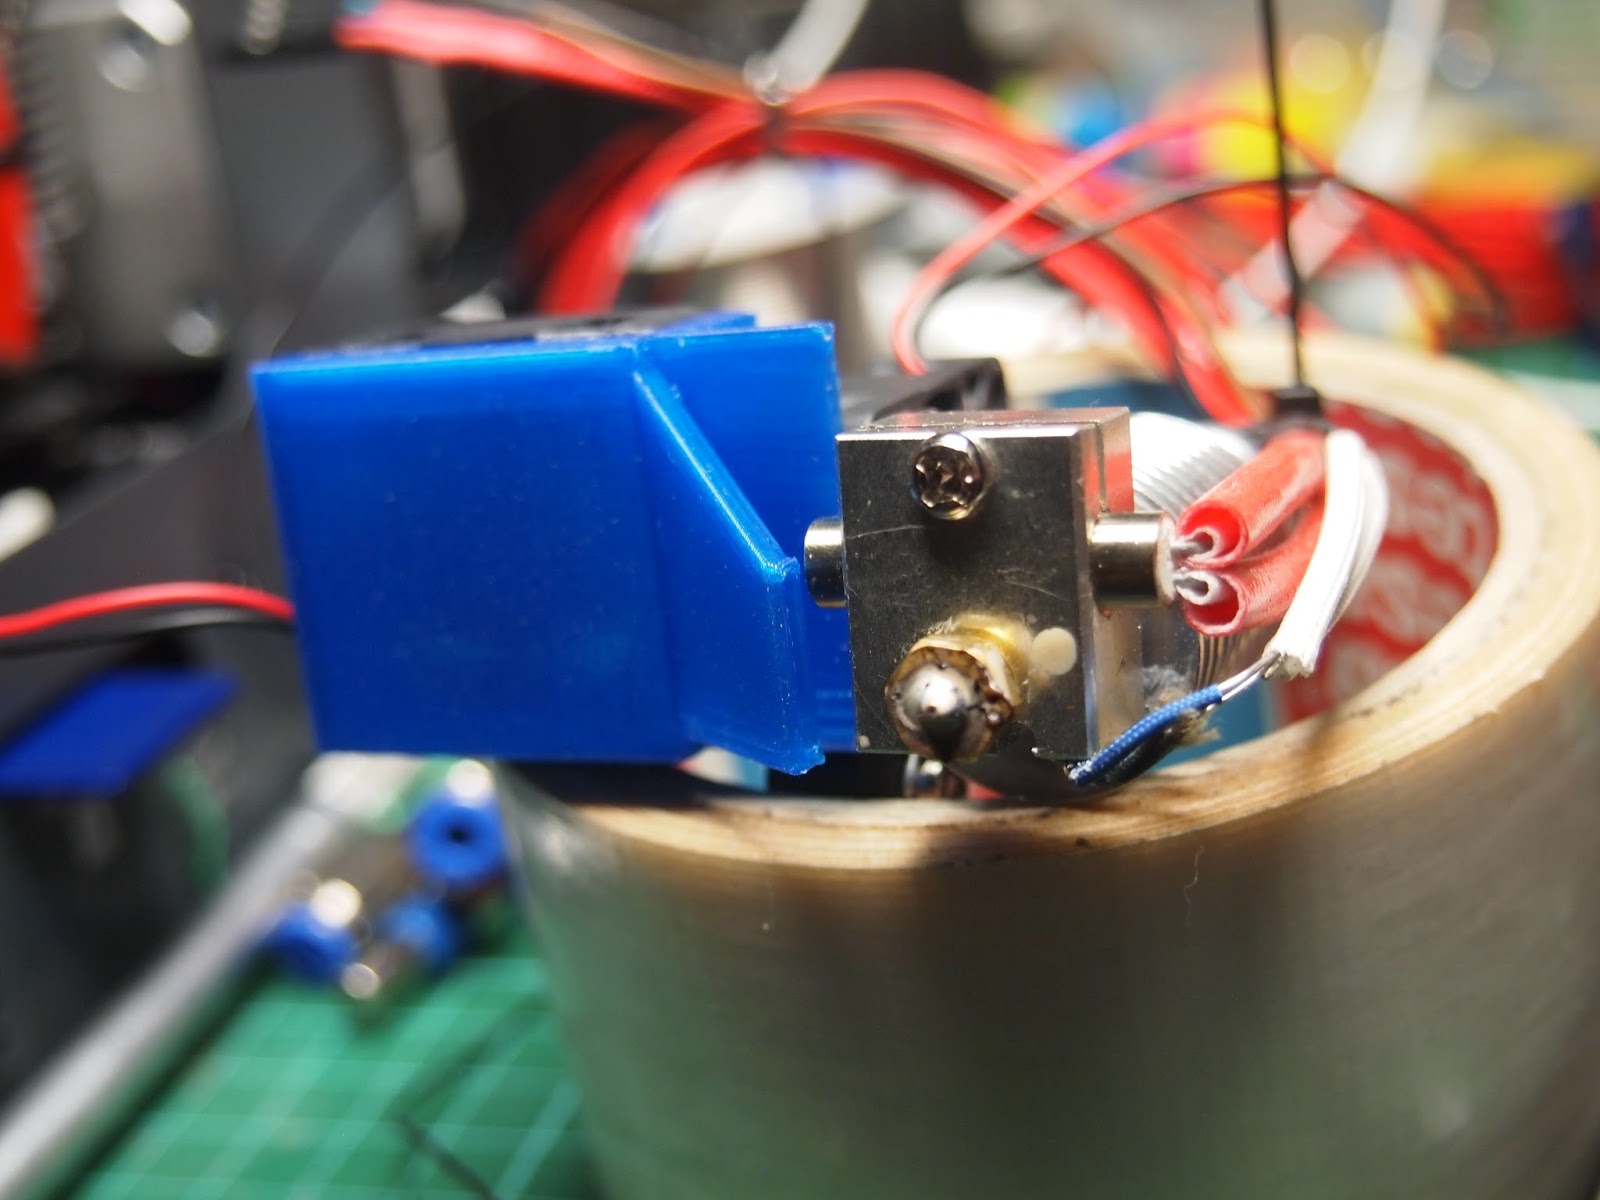
What to do next? Well I have an extra e3d-v6 hot-end so a quick-n-dirty test prepared. Connectors for heat, ntc and blower was soldered and connected to the controllerboard. The ptfe tube moved from the Vertex hot-end to the e3d-v6 hot-end. Photo below showing pla flowing from the hot-end hanging in the ptfe tube.

Nano powered up and ABS-filament load requested. Temperature raised to 240deg very fast and within a few minutes molten filament was streaming out from the hot-end.
So I have a small job replacing the Vertex hot-end with the e3d-v6 and then recalibrate the Nano.
Below is from the first testprint with the e3d-v6 hot-end. Filament is white pla that I usually print at 200deg on my Prusa, (first layer of 210deg). Time from power-up (26deg ambient temperature) to print started about 2½minute.

Now happy printing :-)
/Niels
PS All tests is done with the Marlin version from Vertex.
I have made a few experiments with the Vertex hot-end.
The first experiment was to modify the mounting of the temperature sensing ntc. My thought was that the thermal resistance between the alu-block and the ntc was too high, So I removed the insulating hose around the ntc. Drilled a 2.8mm hole in the aluminium block so the ntc could be mounted inside the block. Just like it is done on other hot-ends.

Then tried to load ABS. 10 minutes observation of temperature. Marlin never found the temperature stable enough to let the filament load begin.
Next experiment was to replace the Vertex ntc with a 100k ntc from an e3d-v6 hot-end.
Result: same as above. No filament loaded.
I don't know much about hot-end design but something is wrong with the Vertex hot-end.
What to do next? Well I have an extra e3d-v6 hot-end so a quick-n-dirty test prepared. Connectors for heat, ntc and blower was soldered and connected to the controllerboard. The ptfe tube moved from the Vertex hot-end to the e3d-v6 hot-end. Photo below showing pla flowing from the hot-end hanging in the ptfe tube.

Nano powered up and ABS-filament load requested. Temperature raised to 240deg very fast and within a few minutes molten filament was streaming out from the hot-end.
So I have a small job replacing the Vertex hot-end with the e3d-v6 and then recalibrate the Nano.
Below is from the first testprint with the e3d-v6 hot-end. Filament is white pla that I usually print at 200deg on my Prusa, (first layer of 210deg). Time from power-up (26deg ambient temperature) to print started about 2½minute.

Now happy printing :-)
/Niels
PS All tests is done with the Marlin version from Vertex.
Thursday, May 25, 2017
Sucessfull fan test.
Today I tried to connect a small 25mm fan to the LED-outputs and it works.
The fan runs from led value of 100 downto about led alue 25.
Next to design a fan duct to be mounted on the hot-end. Either the original or an e3d-v6.
happy printing
/Niels
The fan runs from led value of 100 downto about led alue 25.
Next to design a fan duct to be mounted on the hot-end. Either the original or an e3d-v6.
happy printing
/Niels
Wednesday, May 24, 2017
Frustration. Waiting and waiting and waiting ... PETG
Tried to load PETG filament.
Limited or no sucess. PETG prints at same or a little lower than ABS so I loaded 1.5cm in the extruder and pressed "Load ABS". The temperature cycled between 225deg and 239deg never above when I was watching the printer. I left the workshop with the printer on and when I came back about 10 minutes later it suddenly began loading the filament, strange!
I then loaded my testprint from the SD-card and requested a print. I aborted the job after 10 minutes waiting :-(
PID tuning with a target temperature of 240 deg didn't help at all.
Next step. Replace the factory hotend with an e3d-v6 and try again.
Happy printing
Niels
PS: I don't understand the factory PID-numbers. The numbers I get from PIDtuning is way off the factory settings.
PPS: Maybe a Crazy Idea: The missing cooling fan. I have no need for adjustable LED light. Instead the output can be used to control a variable speed cooling fan. I'll dig into that during the next few days.
A few tips.
A few tips when assembling the printer.
Glue those small stand-offs to the cabinet. This will save you a lot of time later on.

Mark all the connectors. Again a time-saver :-)

In the assembly instructions you are instructed to move the x- and y-axes by hand. That's because the rods arent that smooth from the beginning.
My tip is to rotate the rods in a drill and then use a piece of steel-wool and a small amount of oil to smooth the rods.

Happy printing
Niels
Subscribe to:
Posts (Atom)